Tuesday, March 31, 2015
Monday, March 30, 2015
大米发糕做法
做法
1.米粉加入面粉
2.倒入水,白糖,酵母和泡打粉,(泡打粉选择无铝的)
3.搅拌均匀
4.模具事先涂油
5.将面糊倒入
6.醒发至表面有很多气泡,并涨上一些
7.再蒸20分钟左右即可
枧水棕做法
2012年6月20日星期三
枧水棕
枧水棕
端午节马上就来啦!祝大家端午节快乐~
端午节马上就来啦!祝大家端午节快乐~
枧水是什么?百度知道。
枧水是广式糕点常见的传统辅料,它是祖先们用草木灰加水煮沸浸泡一日,取上清液而得到碱性溶液,草木灰的主要成分是碳酸钾和碳酸钠。在历史上没有现代化学碱的情况下,只好使用这种土法制备的植物碱
黄澄澄的枧水棕,配上椰糖浆~香甜可口~很美味。
材料:
糯米-1公斤
枧水-2汤匙
生油-2汤匙
白糖-1大匙
做法:
1. 选米-预先把糯米里的白米去除。
2. 洗净后加入2汤匙枧水和约2寸高清水浸6小时。
3. 沥干后,加入3茶匙枧水,2汤匙生油,1大匙白糖,一点点硼砂。
【 硼砂属于化学物品,多吃有碍健康,所以不一定要加,可是如果不加打开的粽子糯米会黏在粽子叶上不能成型 】
糯米-1公斤
枧水-2汤匙
生油-2汤匙
白糖-1大匙
做法:
1. 选米-预先把糯米里的白米去除。
2. 洗净后加入2汤匙枧水和约2寸高清水浸6小时。
3. 沥干后,加入3茶匙枧水,2汤匙生油,1大匙白糖,一点点硼砂。
【 硼砂属于化学物品,多吃有碍健康,所以不一定要加,可是如果不加打开的粽子糯米会黏在粽子叶上不能成型 】
碱水粽
http://www.xiachufang.com/recipe/188245/

碱水粽

简介
中国的传统节日形式多样,内容丰富,是我们中华民族悠久的历史文化的一个组成部分。有很多从古开始就流传至今的节日文化和习俗。端午节快到了,虽然各地的习俗有一些差异,但粽子是端午节较最重要的主题。
粽子的种类很多,除了传统的类别,现在已经演绎出了繁多的花样,山珍海味都融入到了粽子里了。当然这粽子的价格也直线上涨,我看今天报纸上陶晶莹代言的元祖龙粽,那价格真是不菲,各种组合中最便宜的都要180元。
其实,在传统节日里最还怀念的就是最传统的节日美食了,在这么多类别的粽子里,我最喜欢,最想吃的就是那最朴实的碱水粽了。
童年时外婆包的碱水粽,少年时母亲包的碱水粽,成年后酷爱粽子的我自己学会了包碱水粽,每逢端午节一定要为自己和家人包上一点碱水粽。
用微火焖上三、四个小时后的碱水粽,剥去粽叶,淡淡的棕黄色里透着一点微绿,那股子朴实的清香味,是其它粽子所不及的。放了碱以后糯米粽,软软的,糯糯的,
蘸一点熬好的红糖糖浆,咬一口,那感觉会使你情不自禁的想起童年、少年时的那些快乐时光。
用料
| 糯米 | 750克 |
| 粽子叶 | |
| 食用碱 | |
| 棉线 |
碱水粽的做法1
- 粽叶泡一天或一晚上,洗净后放入锅里,水没过粽叶水烧开后煮5分钟左右捞起泡入冷水中待用,糯米洗净后泡4小时左右

- 糯米泡好后,沥干水分后重新放入盆中,放入1/4--1/2勺左右的食用碱,因为米粒上还有水,这样放入的碱很快就融化了,放入后马上把它拌匀,注意多拌一下,这样食用碱才能均匀的融化,拌好后放置一小时左右,让碱彻底融入米粒里

- 把粽叶的梗稍剪掉一点,从梗开始向着叶尖的方向逆时针围成圆锥状,把梗的一面叠在叶尖面的里边

- 把泡好,拌过碱的糯米舀入圆锥里,九分满就可以了,再用筷子轻轻的戳一下

- 把上面的叶子盖下来,用虎口卡成三角形,这时叶子在三角形对着虎口的角上

- 把叶子逆时针转到三角形的一个边上,(提示:我是左撇子哈)

- 最后用棉线捆上(棉线最好捆两圈以上)

- 用以上的方法把所有的粽子包完

- 把粽子放入锅里,水烧开后,关中火1小时左右,放入焖烧锅里焖4小时左右后捞出

碱水粽的做法2
- 红糖蘸水:红糖100克加清水100克稍融化后烧开,关小火再熬5分钟左右
Sunday, March 29, 2015
Steamed glutinous rice
Pulut Kukus Cantik Berkilat
Telah beberapa hari, saya asyik dok teringatkan raja segala buah iaitu buah durian. Rupanya bukan saya sahaja yang teringin nak makan durian tetapi Nellisa juga. Balik dari pejabat hari ini, saya terus mengukus pulut untuk dimakan dengan durian bersama santan yang diperah sendiri. Haai sejak pandai mengukus pulut ni, memang saya tak lagi menanak pulut. Bukan apa, tapi kerana pulut yang dikukus memang terhasil sangat cantik dan tidak berkerak.
Jom ikut saya layan yang terlebih rajin ni kerana hari ini saya mengambil gambar langkah demi langkah yang diambil menggunakan handphone Boy kerana kamera kami masuk workshop....
Pulut Kukus
Oleh: Azie Kitchen
Bahan bahan:
Beras pulut
Secubit garam
Secubit garam
2 helai daun pandan
1 sb minyak masak
Serbuk kunyit, jika mahu buat pulut kuning
Cara-cara:
Rendam pulut dalam 1/2 jam ke 2 jam sebelum dikukus. Selepas direndam, gaulkan dgn sedikit garam. Kepada yg nak buat pulut kuning, boleh taburkan serbuk kunyit dan gaulkan.
Masukkan beras pulut ke dalam periuk pengukus yang telah mendidih. Guntingkan daun pandan, jika suka. Kukus selama 15 ke 20 minit.
Masukkan beras pulut ke dalam periuk pengukus yang telah mendidih. Guntingkan daun pandan, jika suka. Kukus selama 15 ke 20 minit.
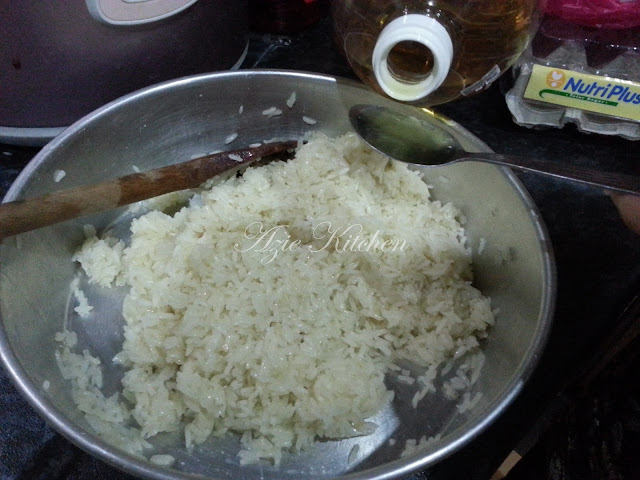
Angkat dan tuang ke dalam bekas. Renjis renjiskan air sedikit demi sedikit ke atas pulut sehingga pulut nampak kebasahan dan lembut.
Tuang pula minyak masak ke atas pulut dan gaul rata. Kemudian masukkan semula pulut ini ke dalam periuk pengukus dan kukus lagi selama 15-20 minit. Kalau pulut masih nampak keras, renjiskan sedikit lagi air.
Angkat dan sedia dihidangkan. Pulut akan menjadi sedap, lembut dan cantik. Bolehlah dimakan sebagai pulut durian, pulut pagi atau apa apa yang disukai.
http://aziejaya.blogspot.com/2012/11/pulut-kukus-cantik-berkilat.html
Anda mungkin juga meminati:
Saturday, March 28, 2015
Wednesday, March 25, 2015
Pressure Cooker Vanilla Cake Recipe
Sunday, December 18, 2011
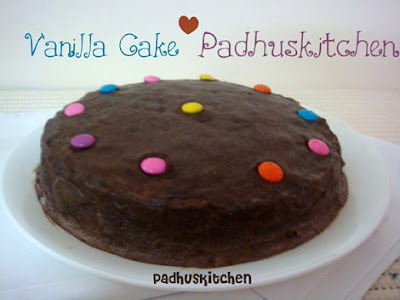
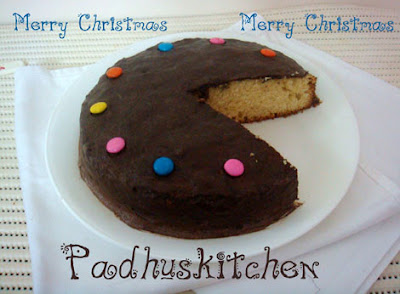
Vanilla Cake Recipe-Pressure Cooker Vanilla Cake Recipe
I have received many queries and emails from friends and many readers asking me for alternative methods of baking cakes which has lead me to do this post. As we know that in India, baking is not that common and many households do not have an oven, but that should not deter one from baking cakes.When I was small, my mother used to bake so many cakes using pressure cooker method as she did not have an electric oven at that time. As this method has be tried and tested so many times in my house, I can assure you that your cake will turn out well. Today we are going to learn how to make vanilla cake in a pressure cooker. I have put chocolate frosting for it as my daughter loves it very much.
Don't have an oven, don't worry, you can still bake cakes this Christmas at home with cooker and surprise your family.
 Easy Home Made Basic Vanilla Cake recipe
Adapted from here
Ingredients needed
All purpose flour (maida) - 1 1/2 cup
Sugar (powdered) -1 cup
Egg -2
Butter - 1/2 cup (125 grams)
Baking powder - 1 1/2 tsp
Salt - 1/4 tsp
Vanilla essence - 1/2 tsp
Milk - 1/2 cup
Preparation
I used the aluminum cooker vessel for baking this cake. Grease the vessel with butter and dust flour. Keep it aside.
Sieve maida, baking powder and salt together twice.
Important point to be noted- Bring everything to room temperature.

Method
Cream butter and sugar well .Use an electric beater or an wooden ladle but beat well untill light and fluffy.
Add eggs and beat again.
Add milk, vanilla essence and beat for a few more minutes.
Fold in flour until well incorporated.
Pour the prepared batter in the prepared cooker vessel.
How to bake cake in Pressure cooker
Fill the cooker with sand till 1 1/2 inches and place the plate you get along with the cooker on top of it. (picture -1)
Preheat the cooker for 5 minutes on high flame with the sand.
(We are following the same principle as in the oven but here the sand is heated and the cake gets cooked in the heat produced by the sand.)
Now, keep the flame in low and place the vessel with the cake batter carefully inside the cooker.
Close the cooker, watch TV or relax as it will take 4o minutes to 1 hours for the cake to be done.
Check it after 40 minutes by inserting a wooden toothpick in the center of the cake, if it comes out clean, your cake is done, otherwise cook for some more time. (Mine took 1 hour)
Important points to be noted while baking cake in pressure cooker
- Do not use the rubber gasket.
- Do not use the weight. (weight valves)
- Do not pour water inside the cooker as we are not steaming the cake.
- It is preferable to use old cooker. Do not heat empty cooker without the sand as your cooker will get damaged.
Steaming ( banana cake made my steaming method)
Pressure cooker

Easy chocolate frosting recipe
Cocoa powder -1/3 cup
Butter -120 grams
Powdered sugar - 1 cup
Hot milk/ hot water -1 -2 tbspVanilla essence -1 1/2 tsp
Method
Beat cocoa powder and butter together.
Add sugar, vanilla essence and milk and mix well.
Keep the mixture in the refrigerator for 15 minutes and then apply it on the cake using a spatula.
Cool the cake before applying the icing. Dip the spatula in hot water to get a smooth finish.
Decorate it with silver balls or chocolate shaving or gems or edible sprinkles. It is all left to your imagination and with whatever you get in India.
For the above cake, you need only half of the above icing recipe.
This Simple vanilla cake and frosting is a great recipe which even beginners can try.
Check out more cakes and cookie recipes
You can bake Eggless Vanilla Cake also in pressure cooker.
Meet you all with more interesting recipes and tips, till then it is bye from Padhu of Padhuskitchen.
Posted by Padhu Sankar at 2:04 AM
Subscribe to:
Posts (Atom)

 柳凝璇
柳凝璇


